Where two roommates collaborate to show you our favorite designs, dining, destinations and to-do's
Showing posts with label Design. Show all posts

Saturday, December 11, 2010

Home for the Holidays

Since this winter storm is preventing me from doing anything but browse the internet, blog, and then blog some more, I thought I would take the time to finally post some pictures of what Christmas looks like over at the Bosworth household (there are a few from Thanksgiving at the McClure's, as well)...  We have yet to take any decent pictures of our apartment holiday decor (so you can still look forward to those). In the mean time, these snapshots should tide you over, and give you a little inspiration for new ideas... Shout out to Mamma Bos for yet another year of great decorations!
Thanksgiving table settings


too bad the star at the top got cut off!


Every Christmas Tree must have an Elf Shelf!


Snow babies :)


Mistletoe Santa's hand painted by my Mom!


Have a collection of broaches that you're not sure what to do with? This could be done with some old buttons or earrings, too

Tuesday, October 26, 2010

Decorative Pets.

Taking inspiration from this [incomplete] wall art seen at a small gift store in Colorado Springs, CO last Spring, I knew I wanted to replicate it in some way in a future home.
But then we were torn with what to do after seeing these adorable little scrapbook paper birdies over at Ashley Ann photography

So we used a combination of the seperate canvas' (one for myself, one for Jess), fabric leaves, and a little DIY work, and came up with this whimsical artwork to hang in our living room. We can't have physical pets here at apartment #2, but that won't stop us from creating our own version of some household pets. Names for these cute little tweeters to come... Any ideas?

Tuesday, October 12, 2010

Chalkboard in the Kitchen

Jess and I have been looking for a corkboard or chalkboard to put in a certain area in our kitchen for awhile now, so THANK YOU goes out to my Aunt Lindy who invited my mom and I to the Umaga gift mart yesterday, where we were able to get all sorts of gifts and home decorations at wholesale cost! Woodwick candles for $1.50, picture frames for $4... heck yes! This is where store buyer's go to purchase all of the inventory for their stores. Needless to say, it was very dangerous... but, of course, we had lots of luck! Below is just a sample of a few of the things we picked up!
Already looking forward to decorating for Christmas in Apartment #2

It's a good thing we didn't purchase THIS at Target last week... this find at the gift mart yesterday only cost us $6!

Tuesday, October 5, 2010

Two months later...

After a great find at Hunt & Gather down the street nearly two months ago, operation "recover our bar stools" is complete! If you don't know who Amy Butler is, and you're thinking about doing a DIY project of your own, you must visit her website, Amy Butler Design. Please ooooh and ahhh a little bit over her fabrics. We're also in love with her wall art!
 Living in the Twin Cities? We found a great selection of her fabrics at Sewtropolis in South Minneapolis-- what a creative concept behind this business!
BEFORE: Yes, that is burlap someone used to recover these seats. All that can be said about that is OUCH.
AFTER!
Kinda wish we would have bought a third... but at least there is one for the each of us, or a couple guests that want to watch us cook :)

Saturday, October 2, 2010

October already?

I suppose now that it is October, it means we should be busting out all our Halloween decorations and go buy our pumpkins! Well, for those of you who don't like this holiday, or the witches, ghosts, and spider window clings that come along with it- here is a tasteful way to celebrate the Halloween & Fall season without going overboard on the haunted house inspired home decor.
DIY supplies needed:
Pumpkins, gords etc. (real or fake... we chose fake so they would last longer)
Decorative napkins of your choice (tissue paper would work well, too)
Mod Podge (You got it. We're decoupaging again!)
Sponge paint brush


Cut napkin into strips for easier application

Ta da!

What's your Design Personality?


If you watch Oprah, then I am sure you are familiar with designer & Minnesota native,  Nate Berkus. Well, it looks like he is another example of the "O" effect, as he is now hosting his own television show, The Nate Berkus Show. If you haven't seen an episode yet, it airs weekdays at 10am (central time). Want to know your design personality?  Do you like Modern? Vintage? Traditional? French Country? Global? A little bit of everything? Take this quiz to find out your design personality.

Turns out, I have a "split personality" when it comes to design...I  like to mix and merge different design styles for a unique look. I tend to go for the one-of-a-kind looks, so it doesn't surprise me that this was the result of the quiz for me... Take the quiz and let us know what you find out!

Saturday, September 4, 2010

Eat, Drink & Découpage

DIY projects #2, 3 & 4

Eat & Drink:
Introducing Jessica to the art of decoupaging was quite entertaining. Attention all neat-freaks: this process is not a clean one. Make sure your fingers are ready to get a little sticky. If you know how to cut and paste, this project is for you. This idea came to us after seeing this kitchen wall décor in the Vivaterra magazine. We didn't feel like spending the $$ on the entire set, so we got creative and decided to make our own version.

Supplies:
* Wood letters from your local art supply store (we purchased ours at Hobby Lobby... which also happened to be the only place we could find the ampersand symbol... that's an "&" for all of you who are clueless as to what that is ;) )
* Bottle of Mod Podge (we used the glossy kind)
* Sponge paint brushes
* Magazines galore!

We kept with the "eat & drink" theme of this and used lots of Bon Appetit and other foodie magazines. We découpaged the word "eat" in all different food cutouts, and the "drink" the same way, with cutouts of different drinks.  This process works better if you apply a thin layer of glue to the back of each piece, and then apply a thin coat over the entire letter once completed. Google it if you're still confused with how to découpage... this is the best explanation I can give for now :)

Project #2: Initial door décor:

Oversized paper mache letters were used for this project (23.5'' letters, purchased at Jo-Anne fabrics), and it was done the same way as our "Eat & Drink". Jess used scrapbooking paper for hers, and I painted mine first, then cut out different flowers, etc. from a magazine. Can't really mess this project up, and is a easy project for kids and adults to add a little pizazz to your walls! These were attached to our doors with velcro, but 3M command strips would work, too.


Project #3: Homage to "Friends"
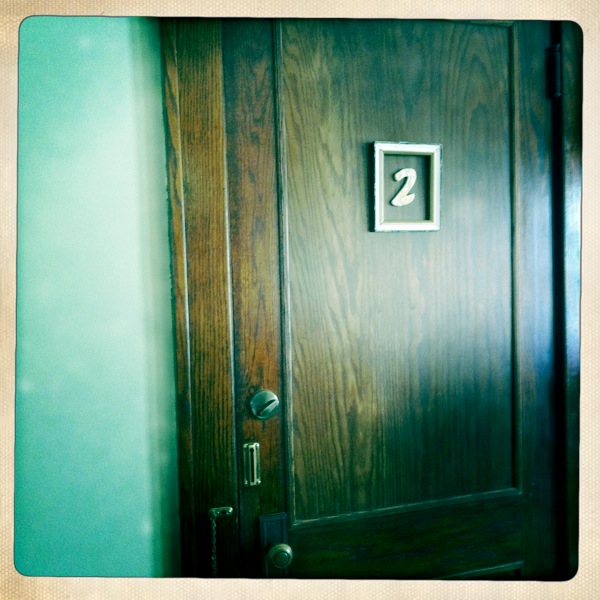
Unfortunately we do not have a peephole on our door like our dear friends, but we pretended, and bought an old frame at Hunt & Gather, along with a small wooden #2 (for apartment #2 :) ) and hung this on our door in place of our peephole... and of course, it was découpaged with leftover paper which matched our living room!
Inspiration
our re-creation

From trash to treasure


DIY project #1: Medicine cabinet jewelry case.

Supplies:
* Medicine cabinet of your liking
* 1 yd. of fabric of your choice (depending on size of cabinet)
* 1-2 rolls of cork (at least 1/4'' thick)
* paint color of your choice for exterior of cabinet
* Stapler
* 1 sheet of foam poster board
* exacto knife
* fabric cording 
* Hooks and pushpins of your choice
* Glue gun

I purchased my old medicine cabinet at Hunt & Gather down the street, but you could probably find one at a local garage sale, flea market, or your favorite antique store.

Step 1: Remove any shelving that you want to free up space for the earring or necklace hooks you will be using. In my case (no pun intended), I wanted to keep some of the character (and function) of this  cabinet, so I left the bottom shelves as it was. I now use these for my perfum, deodorant, bracelets, rings, etc.

Step 2: Pick out a fun paint color, and give it a fresh coat of paint (if needed). I wanted to keep the "antique-look" of mine, so I went with a similar almond color as a good neutral.

Step 3: Go to your nearest craft/fabric store and pick out a fabric you would like to use on the interior of the cabinet. To keep with the look of a jewelry box, I went with an olive green crushed velvet. 1 yd (depending on how large your cabinet is) should be plenty... I think I even had almost a half a yd. left over! Keep in mind this fabric stretches, so you don't need as much as you think! I also bought a roll of cork board and a sheet of foam poster board to wrap the fabric around. The cork will allow you to insert the push-pins and earring studs easier.

Step 4: Measure the dimensions of the interior of the cabinet, and cut a pieces of poster board to match those dimensions. This is what you will be gluing your cork board to, and what you will be wrapping your fabric around. Mistake #1 that I made with this is that I cut the poster board to the exact dimensions of the interior, and did not allow enough room for the door to be able to shut all the way, so you may need to subtract about a 1/4'' when you are doing the sides of the cabinet so that the door can shut all the way. (I hope I didn't lose you yet... this part was kinda tricky)

Step 5: After you have glued the cork board to the poster board, and wrapped the fabric around (I used a regular stapler to attach the fabric... since I was using the foam poster board, it was easy to staple the fabric into this)

Step 6: Use hot glue, super glue, whatever kind of glue you'd like to insert the pieces of poster board inside your cabinet. I did the very back one first, then inserted the sides. After these are secure, use cording that matches your fabric to wrap around the border of the cabinet (to hide any glue that may have leaked, and to make it look a little more neat and pretty :) )

Step 7: Add any pushpins, cording, hooks, etc. to hang your necklaces and earrings. This part is pretty self-explanatory after you see my pictures... I found a key hook at Anthropologie to use to hang all my necklaces, and found push-pins laying around my house that just happened to match the fabric I chose. I also had to go to my neighborhood hardware store to get some chain to attach to my door. Since it is an old cabinet, the lead mirror was a little heavy, so I used chain to prevent the door from swinging open too much.
My Inspiration: Thanks Mr. Judd & Natalie :)

Final product from the outside- I found my own knob to use instead of the one that came with it.
Interior of finished jewelry case

Tuesday, August 31, 2010

The Bachelorette Pad

Our new favorite show, ABC’s “Bachelor Pad,” is the inspiration behind the above title… Minus the blindfolds, bunkbed’s, and stereotyping (we have decided to stay classy & drama-free here in Apartment #2).
Anywho, you all asked for it. Pictures are here at last! We didn’t want to post any until it was presentable to our standards, but we are now very happy with how it all came together, and can’t wait to share with you the design inspirations behind many of the ideas we “DIY’d.” Once we get the hang of this whole “blogging” thing, we hope to be able to organize it well enough so that you all can easily find what you are looking for out of our site. So, you can for sure expect to see our version of a do-it-yourself section, as well as some of our favorite people, places, and things.
Below are photos of our apartment, and quick snapshots of the decorating we’ve done thus far.  Call us copycats if you choose, but we are proud of our execution of the arts & crafts we’ve done so far.
Before:
Craigslist posting that intrigued us and led us to our new home...

 After:
Living Room

View from Dining Room
Dining Room
With an old building comes the old charm. This built-in buffet is now completely full with Jess' 3+ sets of dishes (we even have Christmas dishes). However, I had to steal a drawer at the bottom to put all of my art supplies... this is about all the storage we get, with the exception of our small coat closet. Thanks to Hunt & Gather down the street, we found the perfect vases to complete the decorating.
Jess getting excited for our housewarming party!
View of Kitchen from hallway
Thank you Hobby Lobby for your $5 wall decor.
Hallway just off the kitchen that leads you to our bedrooms and bathroom. The door straight ahead is our other entrance that will take you out our back door near our garage/back parking lot. It is crazy how much bigger this hallway makes our place feel! We LOVE it and how it separates our living spaces. We have an idea for wall decor in the works right now, but won't post pics till it is fully complete... so keep checking back in with us to see the end result!
Jessica's Room is the first room off of the hallway. Please note our 1st complete art project... initials for our doors! We'll post our "how-to" tips soon!
Thanks to Peter, Jess' Parisian prints are perfectly level ;)
Around the corner from Jess' room is our quaint little bathroom. At first the clawfoot tub scared us a little (how were we gonna shave our legs?!) But we have come to love it!
Allie's room! Mine is in the very back of our apartment. Jess has the air conditioner in her room, I get the "bigger" closet. Special thanks goes out [again] to "Hunt & Gather" for my fabulous new $50 headboard!
The re-finished white vanity from DahlHouse Boutique (aka a woman's garage in White Bear Lake... another craigslist find) is probably my favorite purchase I've made so far. The vintage fabric on the stool is original to the set... I got very lucky as it needed zero recovering, and matched my comforter perfectly :) To the left is the medicine cabinet I turned into my jewelry case... directions for this to follow as well!
The sconces in here are another bonus to living in an older building... shades for these were found in the sale section at Anthropologie just down the street (this could possibly be our 'danger zone #4'). The artwork I made above my dresser used to be my "headboard" when I was living in Colorado. Another "DIY" project to post, I suppose?